These garden hose maintenance tips will keep your hose in great shape
Maintaining a lawn is already tedious enough, and one of the worst parts of hauling out all the equipment is dealing with a tangled, damaged hose. Having to stop and untangle all the kinks in the hose not only wastes time, but also leads to extra hassle and frustration. Luckily, there are ways to store and maintain a hose to not only make it last longer, but also make it more accessible. Read on for garden hose maintenance tips that will keep your hose in great shape, for years to come.
Garden Hose Storage
Good gardeners know garden hoses are essential tools for maintaining a healthy-looking garden. Taking a few extra moments to properly store a garden hose after use is important in keeping it maintained for years to come.
Hoses can be easily wound and stored on special hose reels, which can be hand cranked to roll the hose out in a turning motion. Storing hoses on reels can avoid any kinks or knots from developing in the hose. These types of storage reels can be standalone or attached to a wall for easy access.
Depending on the hose’s material, you may decide to store it somewhere where it will experience limited sun exposure. In the case of rubber hoses, this can prevent drying, cracking, and decay over time. You may also want to store the hose in a place where it won’t be run over by bicycles, cars, or feet.
Before wintertime, garden hoses should have all attachments, sprayers, and nozzles removed, and all excess water should be drained from them. This prevents any leftover water from freezing inside the hose or attachments, potentially damaging them.
Dealing with Dripping and Leaking Garden Hoses
A leaky, dripping hose is no good—this means you’re wasting precious water! Wasting water is bad for the environment as well as your wallet. A good way to avoid a leaky garden house is by performing a little preventative maintenance ahead of time. Some gardeners like to replace washers in their garden hose’s connectors at the end of each summer season to ensure they’ll be starting totally fresh when the next spring rolls around.
If you notice your garden hose is dripping despite preventative care, there are other measures you can take to remedy the problem and save your hose from damage. First, you must determine if the leak is coming from the body of the hose itself. Sometimes, hoses can develop splits or tears, causing water to leak from them. However, if the body of the hose is fine, it’s time to turn your attention toward the hose’s other parts.
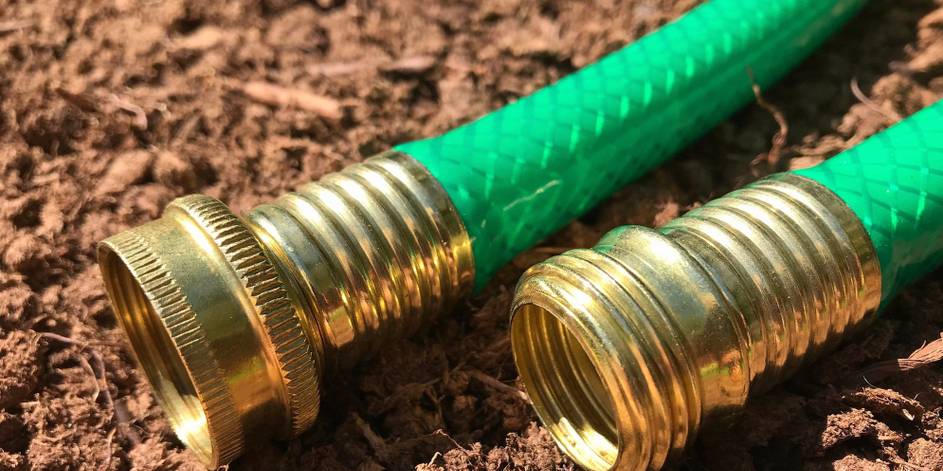
On the female coupler end of the garden hose, there is a washer. When this washer becomes old and worn down, it can cause leaks. The male coupler end of the hose and the spigot do not contain washers, so the female end is the only one that will require a change. Once identified, the washer can be gently pried out with the end of a flathead screwdriver, replaced, and then tested by turning the water on again--if water is still leaking around the new washer, the leak is originating elsewhere.
The hose end is another part that may be causing leaks or drips. To replace a hose end, you must cut the old end off using a sharp pair of scissors or shears. Determine where the material contains holes or small cracks, and then cut those areas off with the scissors (this may require traveling down the hose a few inches, depending on the extent of the damage). After cutting off the bad hose, dry the end of the fresh hose with a paper towel. Then, rub a small amount of dish soap along the inside of the fresh hose. Unscrew the screws on the replacement coupler, fit the new part on the fresh hose, and rescrew the coupler onto the fresh hose until it is snug and will not leak. Test the new part by turning on the water.
Patching Holes or Cracks in a Garden Hose’s Body
Many people decide to toss a garden hose in the trash when they notice a split or hole in its body, but this isn’t always the only option. If the damage to the hose’s body is small or limited, a simple repair job can fix it good as new and save you from spending more money on a replacement.
Small holes can be patched effectively with electrical tape. When preparing to cover a hole with the tape, you should make sure the area around the hole is completely clean and dry. The tape should be overlapped as it is wrapped around the damaged area, but not so tightly that it causes a kink—if the hose continues to kink at the taped area, the damaged spot can become larger and harder to fix. After the tape is applied, test the hose for leaks by turning on the water.
These garden hose maintenance tips are sure to help you keep your hose ready to water the garden and yard with zero issues, for years to come.
Resources — Lowes, Gardening Channel, Home Guides
About The Author