How to Bury Your Trampoline for Safety
Trampoline safety measures have come a long way in the past years. Buying a net and “fence” to put around an above-ground trampoline is an excellent way to go, but you can still do more to ensure the safest backyard adventures with your children.
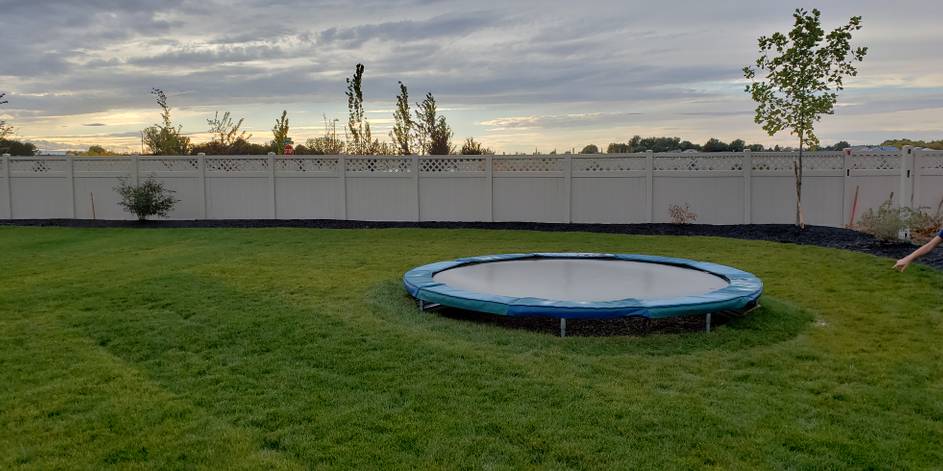
Burying a trampoline has become the next step as parents strive for trampoline safety. It turns out it’s not quite as hard as it may seem and, according to Trampolines Down Under, many parents look at the “hardest part” (AKA digging the hole) as family exercise.
As a note, know that no matter how many precautions you take with your trampoline, the best practices and teaching your children how to be safe on the trampoline is the best way to ensure no injuries. However, because of the nature of play, trampolines will always pose a threat, even with the most cautious environments.
Although trampolines will never be considered “injury-free,” finding the right formula for the ultimate safety experience will include sinking the trampoline into the ground. Keep reading for a few tips and instructions on how to create the best trampolining experience.


Other Benefits of Burying Your Trampoline
First, a few other benefits that may not be thought of when considering whether or not to bury your trampoline. An underground trampoline is more accessible for toddlers to get onto. Another benefit is that your trampoline will no longer be blocking your garden, killing your grass, or digging into the yard during the wet season.
Among the other benefits of a trampoline, the fact of the matter is that it can be decorative. As mentioned, above-ground trampolines can block your garden or put a blemish on your otherwise lovely backyard. When you decide to bury your trampoline, you will be able to work the design into your yard aesthetic and have it work together with the other motifs you are going for.
Tips to Think about When Setting Up your trampoline
Now that you’ve decided to sink your trampoline, there are a few things to think about. Digging the hole, installation, and maintenance will be the main things to consider.
Since you will be the ones digging the hole, the first thing to think about will be how to determine the size of the hole you need to dig.
Once you figure out the diameter of the trampoline, make sure to take into consideration that you’ll need to get under for maintenance when something gets stuck under it (balls, keys, etc.) and that nets will add extra inches. If you decide to keep your net, as safety is critical, make sure to add a few more inches to the diameter of your hole. This way, you’ll be able to add a net later.
With the diameter, then comes the digging, you can dig the hole by and or you can hire professional diggers who may bring equipment to make the process go faster. No matter how you dig your hole, when you get it dug, you’ll have to build a retaining wall. Retaining walls can be made of stones, stone blocks, or concrete. Some people add a metal structure around their retaining wall to reinforce the retention.
Don’t forget about keeping extra space around and underneath the trampoline. Doing this step will help you be able to get under the trampoline when you need access. The retaining wall will also need to have drainage and ventilation. If you don’t include these two items in your design, you will open yourself, your back yard, and your family to insect infestation, rusting trampoline stilts, and a rotating mat.
The best way to incorporate drainage and ventilation is to leave a moat around the trampoline. When you are digging the pit in-depth, you can also leave the hole a little shorter (a few inches) than the trampoline is, height-wise. This way, you’ll have a nice amount of ventilation that can still get through, under, and out of the pit.
If this process overwhelms you, bring in a general contractor to help you with the design. Otherwise, let’s get to the instructions!
How to Bury Your Trampoline
- Step One: Determine the size of your trampoline.
- Step Two: Mark the yard for the excavation area. (You can mark the area with spray paint).
- Step Three: Dig the hole to your determined size and depth of your trampoline (remember to take into account the retaining wall, ventilation, and drainage too). Also, note to dig during a dry season.
- Step Four: The height of your hole. The depth of your hole will be equal to the height of your trampoline. If you’d like to have it a little higher than ground level (for ventilation), make sure that the hole depth is a few inches shorter than your trampoline height.
- Step Five: Create your drainage system.
- Step Six: Get extra soil. There may be times when the hole becomes bigger than your measurements. Having extra soil on hand will help keep your hole the same size.
- Step Seven: Add your trampoline.
Trampolines are extremely precarious. Injuries have led to serious spinal problems and even death. Creating the safest environment will still not ensure an injury-free area; however, taking every precaution you can help you have a sounder mind and smarter kids.
Resources— All Things Thrifty, Rocks for Kids, Trampolines Today
About The Author